


(click to open the video in YouTube) (1:40min)

GPT Pilot is the core technology for the Pythagora VS Code extension that aims to provide the first real AI developer companion. Not just an autocomplete or a helper for PR messages but rather a real AI developer that can write full features, debug them, talk to you about issues, ask for review, etc.
📫 If you would like to get updates on future releases or just get in touch, join our Discord server or you can add your email here. 📬
- 🔌 Requirements
- 🚦How to start using gpt-pilot?
- 🔎 Examples
- 🐳 How to start gpt-pilot in docker?
- 🧑💻️ CLI arguments
- 🏗 How GPT Pilot works?
- 🕴How's GPT Pilot different from Smol developer and GPT engineer?
- 🍻 Contributing
- 🔗 Connect with us
- 🌟 Star history
GPT Pilot aims to research how much LLMs can be utilized to generate fully working, production-ready apps while the developer oversees the implementation.
The main idea is that AI can write most of the code for an app (maybe 95%), but for the rest, 5%, a developer is and will be needed until we get full AGI.
If you are interested in our learnings during this project, you can check our latest blog posts.
- Python 3.9+
👉 If you are using VS Code as your IDE, the easiest way to start is by downloading GPT Pilot VS Code extension. 👈
Otherwise, you can use the CLI tool.
After you have Python and (optionally) PostgreSQL installed, follow these steps:
git clone https://github.com/Pythagora-io/gpt-pilot.git(clone the repo)cd gpt-pilot(go to the repo folder)python -m venv venv(create a virtual environment)source venv/bin/activate(or on Windowsvenv\Scripts\activate) (activate the virtual environment)pip install -r requirements.txt(install the dependencies)cp example-config.json config.json(createconfig.jsonfile)- Set your key and other settings in
config.jsonfile:- LLM Provider (
openai,anthropicorgroq) key and endpoints (leavenullfor default) (note that Azure and OpenRouter are suppored via theopenaisetting) - Your API key (if
null, will be read from the environment variables) - database settings: sqlite is used by default, PostgreSQL should also work
- optionally update
fs.ignore_pathsand add files or folders which shouldn't be tracked by GPT Pilot in workspace, useful to ignore folders created by compilers
- LLM Provider (
python main.py(start GPT Pilot)
All generated code will be stored in the folder workspace inside the folder named after the app name you enter upon starting the pilot.
Assuming you already have the git repository with an earlier version:
git pull(update the repo)source pilot-env/bin/activate(or on Windowspilot-env\Scripts\activate) (activate the virtual environment)pip install -r requirements.txt(install the new dependencies)python main.py --import-v0 pilot/gpt-pilot(this should import your settings and existing projects)
This will create a new database pythagora.db and import all apps from the old database. For each app,
it will import the start of the latest task you were working on.
To verify that the import was successful, you can run python main.py --list to see all the apps you have created,
and check config.json to check the settings were correctly converted to the new config file format (and make
any adjustments if needed).
🔎 Examples
Click here to see all example apps created with GPT Pilot.
git clone https://github.com/Pythagora-io/gpt-pilot.git(clone the repo)- Update the
docker-compose.ymlenvironment variables, which can be done viadocker compose config. If you wish to use a local model, please go to https://localai.io/basics/getting_started/. - By default, GPT Pilot will read & write to
~/gpt-pilot-workspaceon your machine, you can also edit this indocker-compose.yml - run
docker compose build. this will build a gpt-pilot container for you. - run
docker compose up. - access the web terminal on
port 7681 python main.py(start GPT Pilot)
This will start two containers, one being a new image built by the Dockerfile and a Postgres database. The new image also has ttyd installed so that you can easily interact with gpt-pilot. Node is also installed on the image and port 3000 is exposed.
python main.py --listNote: for each project (app), this also lists "branches". Currently we only support having one branch (called "main"), and in the future we plan to add support for multiple project branches.
python main.py --project <app_id>python main.py --project <app_id> --step <step>Warning: this will delete all progress after the specified step!
python main.py --delete <app_id>Delete project with the specified app_id. Warning: this cannot be undone!
python main.py --import-v0 <path>This will import projects from the old GPT Pilot v0.1 database. The path should be the path to the old GPT Pilot v0.1 database. For each project, it will import the start of the latest task you were working on. If the project was already imported, the import procedure will skip it (won't overwrite the project in the database).
There are several other command-line options that mostly support calling GPT Pilot from our VSCode extension. To see all the available options, use the --help flag:
python main.py --helpHere are the steps GPT Pilot takes to create an app:
- You enter the app name and the description.
- Product Owner agent like in real life, does nothing. :)
- Specification Writer agent asks a couple of questions to understand the requirements better if project description is not good enough.
- Architect agent writes up technologies that will be used for the app and checks if all technologies are installed on the machine and installs them if not.
- Tech Lead agent writes up development tasks that the Developer must implement.
- Developer agent takes each task and writes up what needs to be done to implement it. The description is in human-readable form.
- Code Monkey agent takes the Developer's description and the existing file and implements the changes.
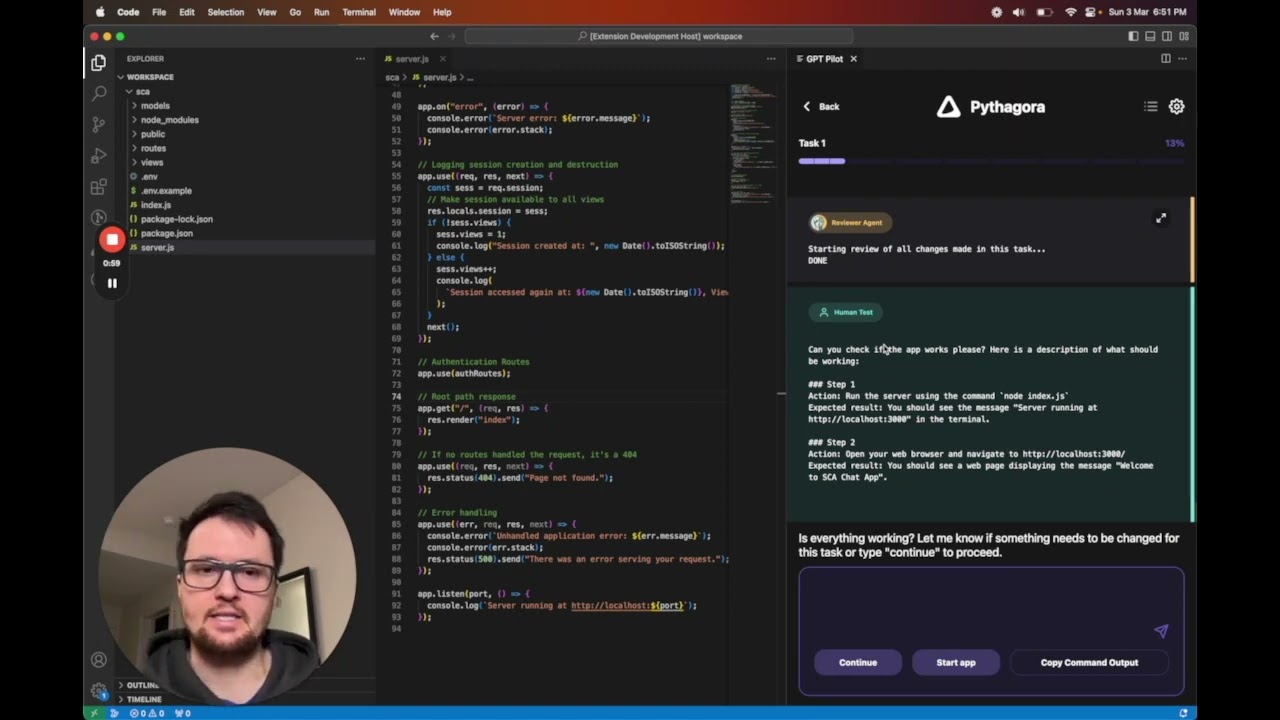
- Reviewer agent reviews every step of the task and if something is done wrong Reviewer sends it back to Code Monkey.
- Troubleshooter agent helps you to give good feedback to GPT Pilot when something is wrong.
- Debugger agent hate to see him, but he is your best friend when things go south.
- Technical Writer agent writes documentation for the project.
- GPT Pilot works with the developer to create a fully working production-ready app - I don't think AI can (at least in the near future) create apps without a developer being involved. So, GPT Pilot codes the app step by step just like a developer would in real life. This way, it can debug issues as they arise throughout the development process. If it gets stuck, you, the developer in charge, can review the code and fix the issue. Other similar tools give you the entire codebase at once - this way, bugs are much harder to fix for AI and for you as a developer.
- Works at scale - GPT Pilot isn't meant to create simple apps but rather so it can work at any scale. It has mechanisms that filter out the code, so in each LLM conversation, it doesn't need to store the entire codebase in context, but it shows the LLM only the relevant code for the current task it's working on. Once an app is finished, you can continue working on it by writing instructions on what feature you want to add.
If you are interested in contributing to GPT Pilot, join our Discord server, check out open GitHub issues, and see if anything interests you. We would be happy to get help in resolving any of those. The best place to start is by reviewing blog posts mentioned above to understand how the architecture works before diving into the codebase.
Other than the research, GPT Pilot needs to be debugged to work in different scenarios. For example, we realized that the quality of the code generated is very sensitive to the size of the development task. When the task is too broad, the code has too many bugs that are hard to fix, but when the development task is too narrow, GPT also seems to struggle in getting the task implemented into the existing code.
To improve GPT Pilot, we are tracking some events from which you can opt out at any time. You can read more about it here.
🌟 As an open-source tool, it would mean the world to us if you starred the GPT-pilot repo 🌟
💬 Join the Discord server to get in touch.